
Running the Simulation
Launch, monitor and interrupt a simulation in BrixDEM.
13.1 Launch simulation
Use Run on the left panel or Simulation › Run Current Simulation. Before running, run a full checklist:
- Project saved;
- Materials and interactions checked;
- Domain contains all geometry;
- confirmed STLs and movements;
- Inlets/outlets with correct normals and added to the list;
- Coherent numerical setup (Δt, gravity, backend);
- Results folder cleaned or intentionally reused.
particles_*.bin and visual_*.bin snapshots, per-step VTK and wear files, births.bin and recovery checkpoints. Otherwise frames from both runs would mix in the player and crash recovery could resume the old run. To keep the previous results, copy the results/outputs folder before running. The CSV files are restarted by the solver itself. When resuming from a checkpoint, only files after the resumed step are removed.13.2 Stop simulation
Use Stop to interrupt an ongoing execution. The stop may take a few moments - the solver needs to finish the current step, close the last snapshot, and update the interface. Do not force the closure of the application during that interval.
13.3 Clear simulation
Clear Simulation removes the results files (VTK, BIN, CSV). Use before a new run when you do not want to mix old snapshots with new ones. If it is useful to preserve the previous version, save the project in a different folder before clearing.
13.4 Monitoring during execution
During execution, observe:
- Status on the top bar - running, paused, finished, error;
- Progress - simulated physical time (e.g.:
t=0.0840 N=411 KE=7.33E-001); - Console - real-time solver messages, warnings and errors;
- Snapshots appearing in the results folder;
- Live Charts energy and particle count, when supported.
13.5 Session Recovery
If a simulation has been interrupted before the end (manual stop or unexpected shutdown), BrixDEM detects this when opening and displays the window Session Recovery, listing the interrupted simulations with the date of last activity. You can Recover one of them (resuming from the last checkpoint saved), Discard or Skip All to start clean.
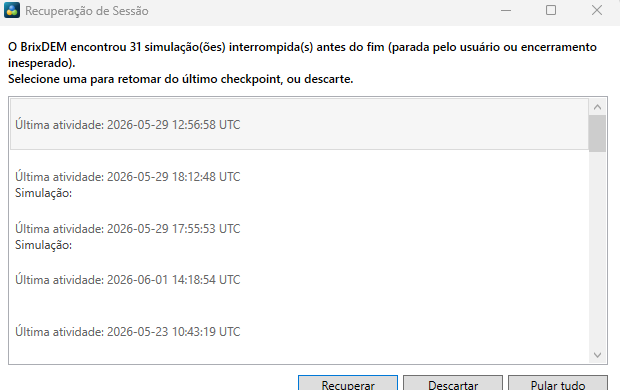
checkpoint_final.bin). The checkpoint also preserves accumulated flow credit and the one-time inlet fill state. It is this file that allows you to resume a long simulation from where you stopped, without restarting from scratch. Materials, geometries, inlets and the run schedule are not part of the checkpoint - they must already be configured in the project exactly as they were when the checkpoint was saved (Chapter 13.7).13.6 Editing the case during a run
You do not have to stop and restart to change a parameter. The flow is pause → edit → resume: you may edit the interface at any time, but nothing is applied in flight. When you click Resume, the GUI compares the current interface state against the snapshot taken at the start of the run and acts according to what changed.
| WHAT CHANGED | WHAT HAPPENS ON RESUME |
|---|---|
| Total time, Δt, snapshot frequency, gravity, Verlet parameters, colours, STL/surface motion (except Elevator and Free-body 6-DOF — row below), including ramps, inlet flow rate and velocity | Applicable live. A dialog lists the detected changes; on confirmation they are sent to the solver and take effect in the continuation of the same run |
| Elevator motion or Free-body 6-DOF (7.11) | Does not change on pause/resume. The edit is ignored for that run - the GUI lists the item as not applied; the new configuration only takes effect from a new Run onward (Chapter 13.7) |
| Materials, pair interactions, geometry, domain, inlet/outlet structure, execution backend, CGF | Invalidates the run. A warning explains that these only take effect in the next run; you choose to resume anyway (the run continues with the old values) or stay paused and restart |
13.7 Restart restrictions: Elevator and Free-body 6-DOF
The checkpoint records the state of the particles and contacts, not the scene configuration. So resuming a simulation (whether through Session Recovery, 13.5, or pause/resume, 13.6) requires materials, geometries, inlets and the schedule to already be configured in the project exactly as they were when the checkpoint was recorded - BrixDEM does not rebuild them from the checkpoint file.
For Elevator motion and Free-body 6-DOF (7.11) this requirement is explicitly checked and locked, because both define the kinematics/state of the body that gets saved in the checkpoint - it is not safe to combine the checkpoint with parameters different from the ones that produced it:
- Resuming a saved checkpoint (Session Recovery, or reopening a project with an interrupted simulation): if the Elevator/6-DOF configuration of any body changed since the checkpoint was recorded, the resume is blocked, with the warning ("Incompatible checkpoint"):
- Pause → edit → resume within the same run (13.6): editing the Elevator/6-DOF configuration during the pause is not applied - the change is silently ignored for that run, and the GUI lists the item as not applied: "elevator/free-body 6-DOF configuration does not change on pause/resume (only on a new run)".
In practice: if you need to change an Elevator circuit or a 6-DOF body's configuration, do it before recording the first checkpoint, or start a new Run - never in the middle of a resume.